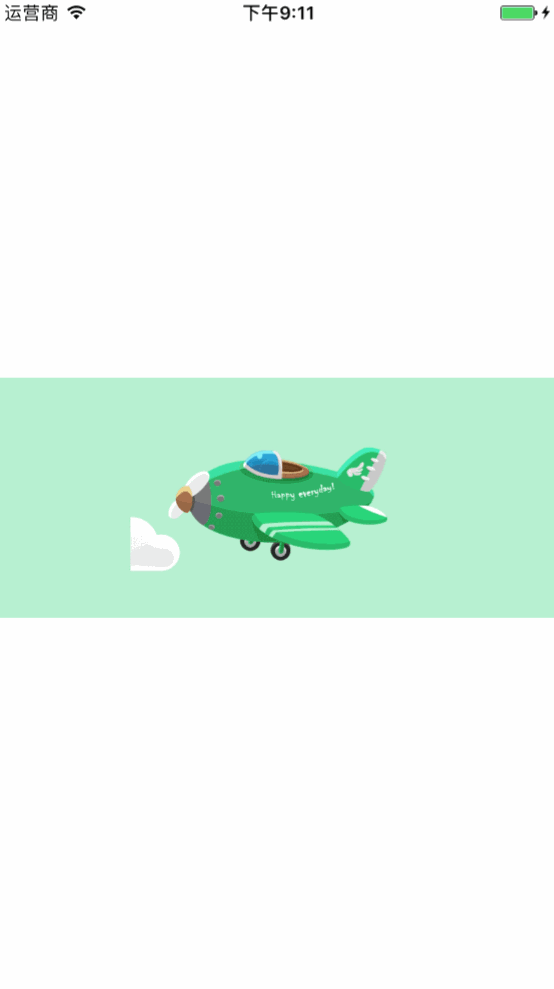
显示层关键帧动画
实现飞机由远及近的移动,并在移动过程中使飞机逐渐变大。
初始化飞机和机场视图
imageViewAirport = UIImageView() imageViewAirport?.frame = UIScreen.main.bounds imageViewAirport?.image = UIImage(named: "Airport.png") imageViewAirport?.contentMode = UIViewContentMode.scaleAspectFit self.view.addSubview(imageViewAirport!) imageViewPlane = UIImageView() imageViewPlane?.frame = CGRect(x: 100, y: 100, width: 50, height: 50) imageViewPlane?.image = UIImage(named: "Plane.png") imageViewPlane?.contentMode = UIViewContentMode.scaleAspectFit imageViewAirport!.addSubview(imageViewPlane!)
|
飞机移动并变大
UIView.animateKeyframes(withDuration: 2, delay: 0, options: UIViewKeyframeAnimationOptions.calculationModeCubic, animations: {() in self.imageViewPlane?.frame = CGRect(x: 300, y: 300, width: 50, height: 50) }, completion:{(finish) in print("done") })
|
效果如下:

关键帧复杂动画
再来一组显示层关键帧复杂动画,刚才逐帧动画只是让飞机在2点之间移动,这次做一下复杂动画,使飞机先向远处飞行并变小,而后再从远处飞回,飞机变大。
初始化飞机和机场
imageViewAirport = UIImageView() imageViewAirport?.frame = UIScreen.main.bounds imageViewAirport?.image = UIImage(named: "Airport.png") imageViewAirport?.contentMode = UIViewContentMode.scaleAspectFit self.view.addSubview(imageViewAirport!) imageViewPlane = UIImageView() imageViewPlane?.frame = CGRect(x: 100, y: 100, width: 50, height: 50) imageViewPlane?.image = UIImage(named: "Plane.png") imageViewPlane?.contentMode = UIViewContentMode.scaleAspectFit imageViewAirport!.addSubview(imageViewPlane!)
|
移动飞机的位置到远处,动画结束后再移动到近处
UIView.animateKeyframes(withDuration: 2, delay: 0, options: UIViewKeyframeAnimationOptions.calculationModeCubic, animations: {() in UIView.addKeyframe(withRelativeStartTime: 0, relativeDuration: 1/2, animations: { self.imageViewPlane?.frame = CGRect(x: 300, y: 100, width: 30, height: 30) }) UIView.addKeyframe(withRelativeStartTime: 1/2, relativeDuration: 1/2, animations: { self.imageViewPlane?.frame = CGRect(x: 300, y: 300, width: 80, height: 80) }) }, completion:{(finish) in print("done") })
|
效果如下:
上文源码:点击前往
显示层逐帧动画
逐帧动画的实现效果就是将图片一帧帧的逐帧渲染。
基于 NSTimer 的逐帧动画
基于 NSTimer 的逐帧动画经常使用在动画帧率不高,且帧率之间的时间间隔并不十分严格的情况下。
添加逐帧动画的素材并初始化定时器
Img = UIImageView() Img?.frame = UIScreen.main.bounds Img?.contentMode = UIViewContentMode.scaleAspectFit self.view.addSubview(Img!) index = 0 timer = Timer.scheduledTimer(timeInterval:0.1,target:self,selector:#selector(ViewController.refushImage),userInfo:nil,repeats:true)
|
实现定时器事件
func refushImage() { Img?.image = UIImage(named: "\(index).png") index += 1 if(index == 67){ timer?.invalidate() index -= 1 Img?.image = UIImage(named: "\(index).png") } }
|
以上代码表示逐帧展示,若希望动画能够实现循环,则在最后一帧动画时初始化第一帧
func refushImage() { Img?.image = UIImage(named: "\(index).png") index += 1 if(index == 67){ index == 0; } }
|
效果如下:
基于 CADisplayLink 的逐帧动画
iOS 设备的屏幕刷新频率默认是 60Hz,而 CADisplayLink 可以保持和屏幕频率相同的频率将内容渲染到屏幕上,因此它的精度非常高。 CADisplayLink 在使用时需要注册到 runloop 中,每当刷帧频率达到的时候 runloop 就会向 CADisplayLink 指定的 target 发送一次指定的 selector 消息,相应的 selector 中的方法就会调用一次。
Img = UIImageView() Img?.frame = UIScreen.main.bounds Img?.contentMode = UIViewContentMode.scaleAspectFit self.view.addSubview(Img!) index = 0 displaylink = CADisplayLink.init(target: self, selector: #selector(ViewController.refushImage)) displaylink?.preferredFramesPerSecond = 60 displaylink?.add(to: RunLoop.current, forMode: RunLoopMode.defaultRunLoopMode)
|
func refushImage() { Img?.image = UIImage(named: "\(index).png") index += 1 if(index == 67){ index = 0 } }
|
基于 draw 方法的逐帧动画
在 UiView 中还有一个非常重要的方法: draw() 方法。当创建一个新的 View 时,其自动生成了一个 draw() 方法,且此方法可以被重写,一旦 draw() 方法被调用, Cocoa 就会为我们创建一个图形上下文,在图形上下文中的所有操作最终都会反应在当前的 UiView 界面上。按照这个思路,如果定期调用 draw() 方法绘制新的内容,那么就可以实现逐帧动画的效果。
总结一下 draw() 触发的机制
(1)使用 addSubView 会触发 layoutSubviews。
(2)使用 view 的 frame 属性会触发 layoutSubviews(frame更新)。
(3)直接调用 setLayoutSubviews 方法会触发 layoutSubviews。
现在使用 draw() 实现黑洞动画
class BlackHoleView: UIView { var blackHoleRadius:Float = 0 func blackHoleIncrease(_ radius: Float){ blackHoleRadius = radius self.setNeedsDisplay() } override func draw(_ rect: CGRect) { let ctx:CGContext = UIGraphicsGetCurrentContext()! ctx.addArc(center: CGPoint(x:self.center.x,y:self.center.y), radius: CGFloat(blackHoleRadius), startAngle: 0, endAngle: CGFloat(M_PI * 2), clockwise: false) ctx.fillPath() } }
|
初始化一个黑洞半径的浮点型参数,并公开黑洞半径增加的方法。然后重写 draw()。
其中 ctx.addArc 方法绘制圆形,该方法参数:
center: CGPoint:表示当前绘制圆形的中心点的x,y坐标
radius: CGFloat:表示当前绘制的圆形半径
startAngle:表示当前绘制圆形的开始角度
endAngle:表示当前绘制圆形的开始角度,通过合理的设置,结束的角度还可以绘制扇形
clockwise: false 表示逆时针绘制,true 表示顺时针绘制
代码最后一行开始绘制圆形。以上为 BlackHoleView 类的主要实现代码。
下面是 ViewController 中的实现代码
var blackHole:BlackHoleView? var timer:Timer? var index:Float = 0 override func viewDidLoad() { super.viewDidLoad() blackHole = BlackHoleView() blackHole?.frame = UIScreen.main.bounds blackHole?.backgroundColor = UIColor.cyan self.view.addSubview(blackHole!) index = 0 timer = Timer.scheduledTimer(timeInterval: 1.0/30, target: self, selector: #selector(ViewController.refushImage), userInfo:nil, repeats: true) } func refushImage(){ blackHole?.blackHoleIncrease(index) index += 1 }
|
效果如下:
小结:
CADisplayLink 精度很高,可以用于实现一些频率较高、帧率要求严格的动画效果。
draw() 是 UIView 中重绘的重要方法,在 draw() 方法中,对上下文的修改都直接展示在 UIView 上,因此通过定期修改 draw() 中的内容也可以实现逐帧动画的效果,而且这种动画不需要事先准备大量的素材,可用性较好。
上文代码:点击查看

微信扫一扫,向我赞赏

支付宝扫一扫,向我赞赏