Swift Animation 登录按钮动画

Posted by Calvin on 2017-06-25

登录按钮的水纹动画

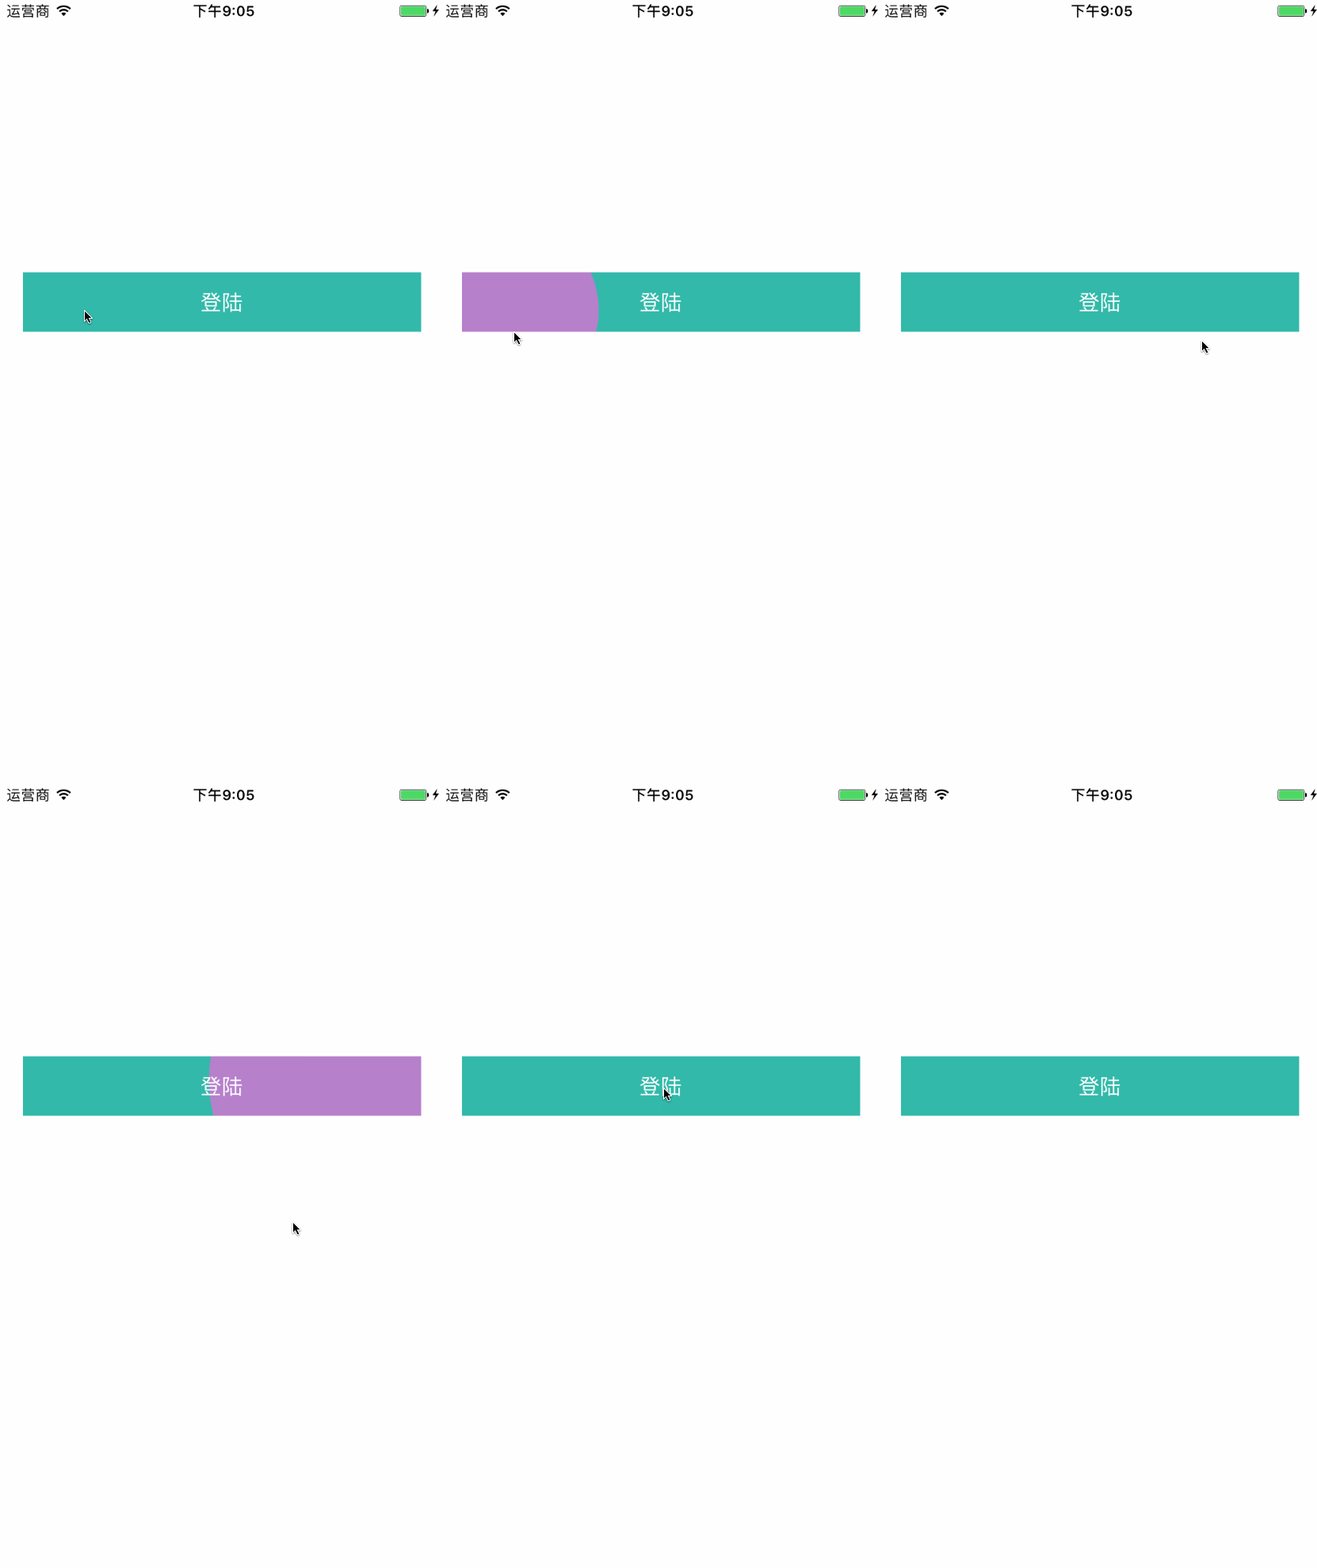
当点击登录按钮时,会以点击点为圆心形成水纹扩散。扩散形状为圆形,扩散颜色为粉色,在扩散过程中按钮的状态为不可点击。

水纹动画拆解为以下5个功能模块

  1. UIButton 坐标获取
  2. Draw 圆形绘制
  3. 定时器刷新
  4. 其他模块
  5. 调用模块

创建基于 UIButton 的 MyButton 类

坐标获取

func startButtonAnimation(_ msenderBt:UIButton,mevent:UIEvent){
self.isUserInteractionEnabled = false
let button:UIView = msenderBt as UIView
let touchSet:NSSet=mevent.touches(for: button)! as NSSet
var touchArray:[AnyObject] = touchSet.allObjects as [AnyObject]
let touch1:UITouch = touchArray[0] as! UITouch
let point1:CGPoint = touch1.location(in: button)
self.circleCenterX = point1.x
self.circleCenterY = point1.y
timer = Timer.scheduledTimer(timeInterval: 0.02, target: self,
selector: #selector(MyButton.timeaction), userInfo: nil, repeats: true);
RunLoop.main.add(timer!, forMode:RunLoopMode.commonModes)
}

Draw 绘制圆形

override func draw(_ rect: CGRect) {
let ctx:CGContext = UIGraphicsGetCurrentContext()!
let endangle:CGFloat = CGFloat(M_PI*2)
ctx.addArc(center:CGPoint(x:circleCenterX,y:circleCenterY),radius:viewRadius,startAngle:0,endAngle:endangle,clockwise:false)
let stockColor:UIColor = targetAnimColor
stockColor.setStroke()
stockColor.setFill()
ctx.fillPath()
}

定时器刷新模块

func timeaction(){
countNum += 1
let dismissTime:DispatchTime = DispatchTime.now() + Double(Int64(0*NSEC_PER_SEC)) / Double(NSEC_PER_SEC)
DispatchQueue.main.asyncAfter(deadline: dismissTime, execute: {() in
self.viewRadius += 5
self.setNeedsDisplay()
})
if(countNum>50){
countNum = 0
viewRadius = 0
timer?.invalidate()
DispatchQueue.main.asyncAfter(deadline: dismissTime, execute: {() in
self.viewRadius = 0
self.setNeedsDisplay()
})
self.isUserInteractionEnabled = true
}
}

init 初始化方法和各参数的初始化

var viewRadius:CGFloat = 0
var countNum:Int = 0
var timer:Timer?
var circleCenterX:CGFloat = 0
var circleCenterY:CGFloat = 0
var targetAnimColor:UIColor = UIColor(red: 216.0 / 255.0, green: 114.0 / 255.0, blue: 213.0 / 255.0, alpha: 0.8)
override init(frame: CGRect) {
super.init(frame: frame)
self.backgroundColor = UIColor(red: 50/255.0, green: 185/255.0, blue: 170/255.0, alpha: 1.0)
}
required init(coder aDecoder: NSCoder) {
super.init(coder: aDecoder)!
}

在 ViewController 调用

let loginButton:MyButton = MyButton(frame: CGRect(x: 20, y: 230, width: self.view.frame.width-20*2,height: 50))
loginButton.setTitle("登陆", for: UIControlState())
loginButton.addTarget(self, action: #selector(ViewController.loginAction(_:event:)), for: UIControlEvents.touchUpInside)
self.view.addSubview(loginButton)
func loginAction(_ sender:UIButton,event:UIEvent) {
let bt:MyButton = sender as! MyButton
bt.startButtonAnimation(sender, mevent: event)
}

效果如下:

2017062414983095544093.gif

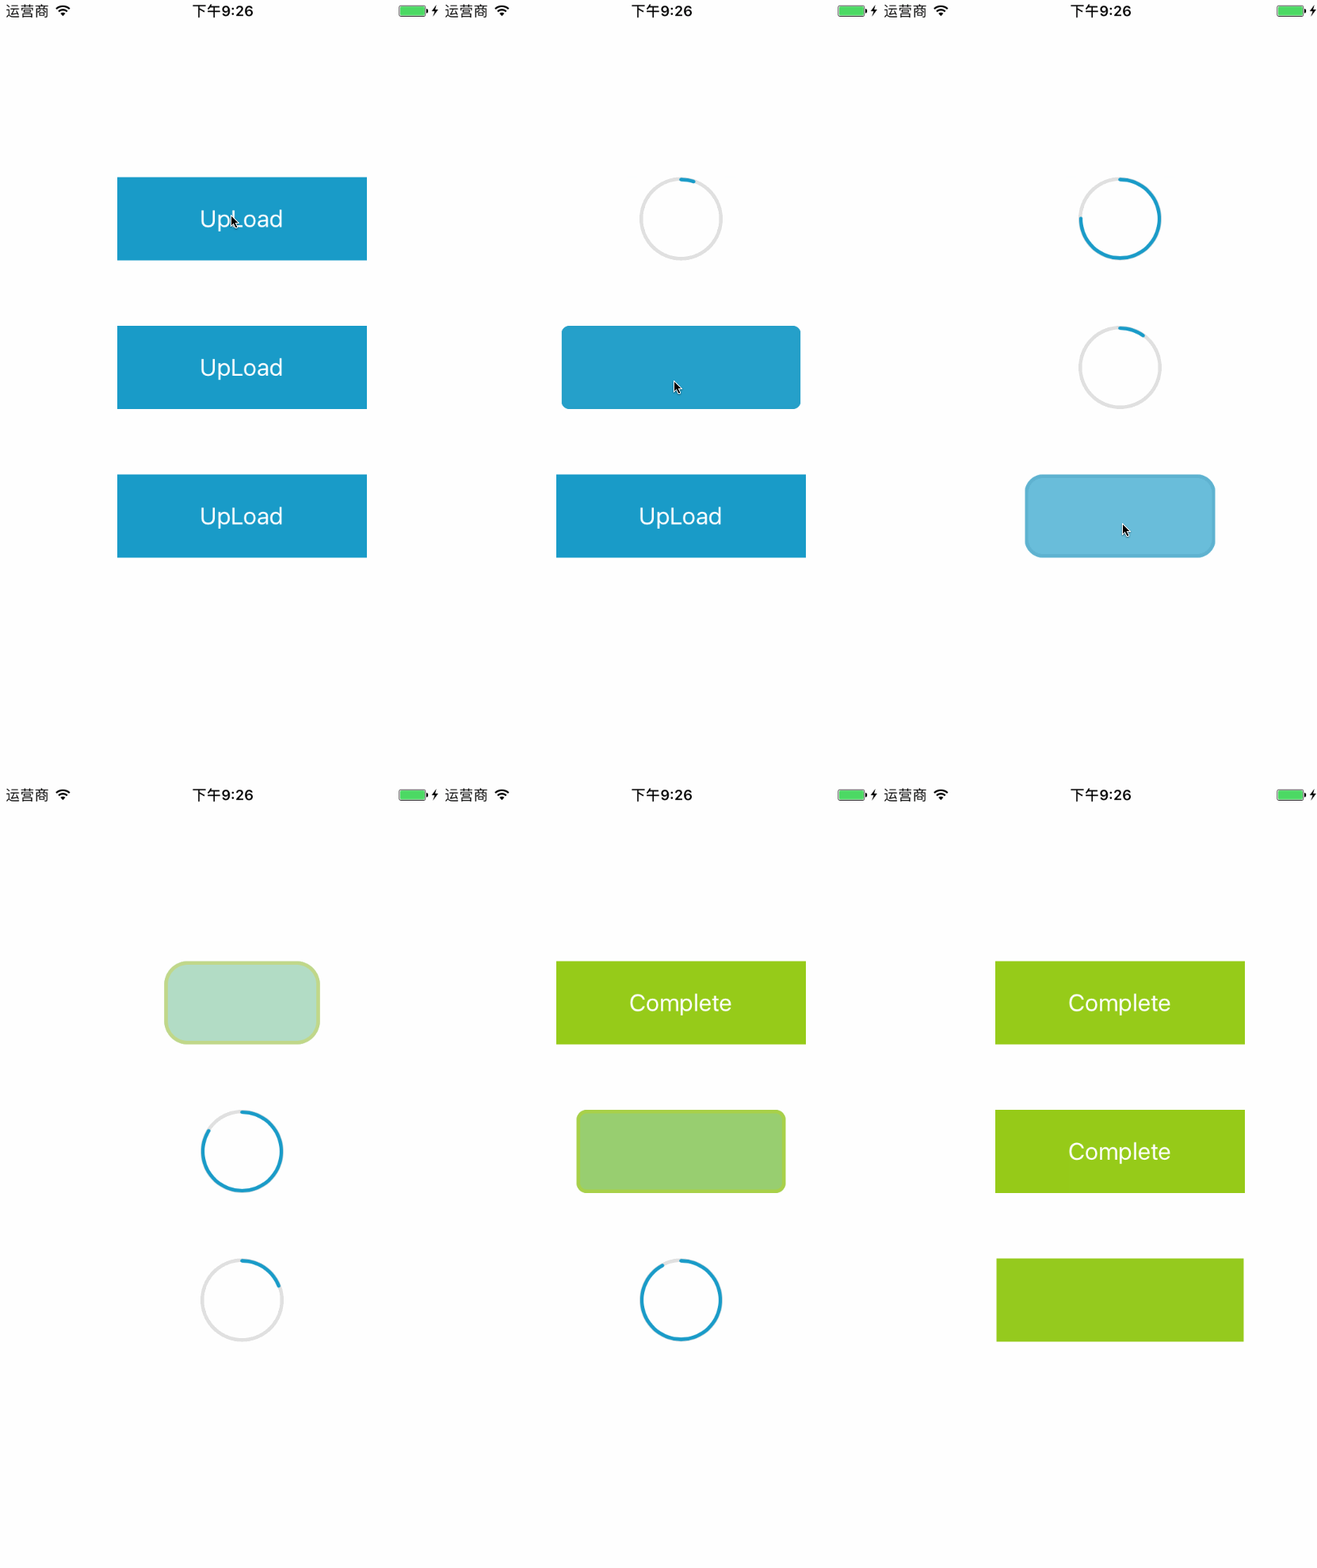
按钮的渐进圆环动画

按钮渐进动画分析

第一阶段:按钮从长方形到圆角的圆角动画,颜色逐渐消失的颜色淡出动画,以及最后的长方形消失、圆弧显示出来的一系列过程。

第二阶段:动画从圆弧显示开始出来,顺时针绘制圆弧,直至圆弧最终绘制完成。主要涉及到圆弧绘制动画,以及在绘制动画过程时的蓝色填充效果。

第三阶段:从圆弧绘制完成到圆弧伸展成长方形,在伸展过程中,伴随着颜色的变化,圆角动画等基础动画效果。

下面就这三个阶段的动画进行代码实现:

第一阶段动画

创建基于 UIView 的 ButtonView 类

let FreshBlue:UIColor = UIColor(red: 25.0 / 255.0, green: 155.0 / 255.0, blue: 200.0 / 255.0, alpha: 1.0)
let FreshGreen:UIColor = UIColor(red: 150.0 / 255.0, green: 203.0 / 255.0, blue: 25.0 / 255.0, alpha: 1.0)
var view:UIView?
var viewborder:UIView?
var button_x:CGFloat = 0
var button_y:CGFloat = 0
var button_w:CGFloat = 0
var button_h:CGFloat = 0
var label:UILabel?
var circleView:CircleView?
override init(frame: CGRect) {
super.init(frame: frame)
button_x = frame.origin.x;
button_y = frame.origin.y;
button_w = frame.size.width;
button_h = frame.size.height;
view = UIView(frame:CGRect(x: 0, y: 0, width: button_w, height: button_h))
view!.backgroundColor = FreshBlue;
viewborder = UIView(frame:CGRect(x: 0, y: 0, width: button_w, height: button_h))
viewborder!.backgroundColor = UIColor.clear
viewborder!.layer.borderColor = FreshBlue.cgColor;
viewborder!.layer.borderWidth = 3.0;
self.addSubview(view!)
self.addSubview(viewborder!)
circleView = CircleView(frame:CGRect(x: 0, y: 0, width: button_w, height: button_h))
circleView!.delegate = self as CircleDelegate
self.addSubview(circleView!)
label = UILabel(frame:CGRect(x: 0, y: 0, width: button_w, height: button_h))
label!.text = "UpLoad"
label!.textAlignment = NSTextAlignment.center
label!.textColor = UIColor.white
label!.font = UIFont.systemFont(ofSize: 20.0)
self .addSubview(label!)
}
func startAnimation(){
label?.removeFromSuperview()
let animMakeBigger:CABasicAnimation = CABasicAnimation()
animMakeBigger.keyPath = "cornerRadius"
animMakeBigger.fromValue=5.0
animMakeBigger.toValue=button_h/2.0
let animBounds:CABasicAnimation = CABasicAnimation()
animBounds.keyPath = "bounds"
animBounds.toValue = NSValue(cgRect:CGRect(x: button_x+(button_w-button_h)/2, y: button_h, width: button_h, height: button_h))
let animAlpha:CABasicAnimation = CABasicAnimation()
animAlpha.keyPath = "opacity"
animAlpha.toValue = 0
let animGroup:CAAnimationGroup = CAAnimationGroup()
animGroup.duration = 1
animGroup.repeatCount = 1
animGroup.isRemovedOnCompletion = false
animGroup.fillMode=kCAFillModeForwards
animGroup.timingFunction = CAMediaTimingFunction(name:kCAMediaTimingFunctionEaseInEaseOut)
animGroup.animations = [animMakeBigger,animBounds,animAlpha]
let animborder:CABasicAnimation = CABasicAnimation()
animborder.keyPath = "borderColor"
animborder.toValue = UIColor(red: 224.0/255, green: 224.0/255, blue: 224.0/255, alpha: 1.0).cgColor
let animGroupAll:CAAnimationGroup = CAAnimationGroup()
animGroupAll.duration = 1
animGroupAll.repeatCount = 1
animGroupAll.isRemovedOnCompletion = false
animGroupAll.fillMode=kCAFillModeForwards ;
animGroupAll.timingFunction = CAMediaTimingFunction(name:kCAMediaTimingFunctionEaseInEaseOut)
animGroupAll.animations = [animMakeBigger,animBounds,animborder]
animGroupAll.delegate = self
animGroupAll.setValue("allMyAnimationsBoard", forKey: "groupborderkey")
CATransaction.begin()
view?.layer.add(animGroup, forKey: "allMyAnimation")
viewborder?.layer.add(animGroupAll, forKey: "allMyAnimationsBoard")
CATransaction.commit()
}

第二阶段动画

第二阶段动画主要为绘制圆环,在此创建一个类 CircleView

protocol CircleDelegate{
func circleAnimationStop()
}
class CircleView: UIView,CAAnimationDelegate {
var lineWidth:NSNumber = 3.0
var strokeColor:UIColor = UIColor(red: 25.0 / 255.0, green: 155.0 / 255.0, blue: 200.0 / 255.0, alpha: 1.0)
var circle:CAShapeLayer = CAShapeLayer()
var delegate:CircleDelegate?
override init(frame: CGRect) {
super.init(frame: frame)
let startAngle:CGFloat = -90.0/180.0 * CGFloat(M_PI)
let endAngle:CGFloat = -90.01/180.0 * CGFloat(M_PI)
let circlePath:UIBezierPath = UIBezierPath(arcCenter: CGPoint(x: frame.size.width/2,y: frame.size.height/2), radius: frame.size.height/2-2, startAngle: startAngle, endAngle: endAngle, clockwise: true)
circle.path = circlePath.cgPath
circle.lineCap = kCALineCapRound
circle.fillColor = UIColor.clear.cgColor
circle.lineWidth = lineWidth as CGFloat
self.layer.addSublayer(circle)
}
func strokeChart(){
circle.lineWidth = lineWidth as CGFloat
circle.strokeColor = strokeColor.cgColor
let pathAnimation:CABasicAnimation = CABasicAnimation()
pathAnimation.keyPath = "strokeEnd"
pathAnimation.delegate = self
pathAnimation.duration = 3.0
pathAnimation.timingFunction = CAMediaTimingFunction(name:kCAMediaTimingFunctionEaseInEaseOut)
pathAnimation.fromValue = 0.0
pathAnimation.toValue = 1.0
pathAnimation .setValue("strokeEndAnimationcircle", forKey: "groupborderkeycircle")
circle.add(pathAnimation, forKey: "strokeEndAnimationcircle")
}
func animationDidStop(_ anim: CAAnimation, finished flag: Bool) {
delegate!.circleAnimationStop()
}
required init?(coder aDecoder: NSCoder) {
fatalError("init(coder:) has not been implemented")
}
}

在这里代码已经实现了第二阶段,如果从第一阶段动画进入到第二阶段呢?在第一阶段的动画中已经设置了 delegate 回调对象,因此在第一阶段的动画结束后的回调方法中启动第二阶段动画。

func animationDidStop(_ anim: CAAnimation, finished flag: Bool){
if(flag){
let animType = anim.value(forKey: "groupborderkey")
let animType1 = anim.value(forKey: "groupborderkey1")
if(animType != nil){
if ((animType as! NSString).isEqual(to: "allMyAnimationsBoard")){
circleView?.strokeChart()
}
}else if(animType1 != nil){
if((animType1 as! NSString).isEqual(to: "allMyAnimationsBoardspread1")){
label = UILabel(frame:CGRect(x: 0, y: 0, width: button_w, height: button_h))
label!.text = "Complete"
label!.textAlignment = NSTextAlignment.center
label!.textColor = UIColor.white
label!.font = UIFont.systemFont(ofSize: 20)
self.addSubview(label!)
}
}
}
}

第三阶段动画

func startAnimationSpread(){
let animMakeBigger:CABasicAnimation = CABasicAnimation()
animMakeBigger.keyPath = "cornerRadius"
animMakeBigger.fromValue=button_h/2.0
animMakeBigger.toValue=0
let animBounds:CABasicAnimation = CABasicAnimation()
animBounds.keyPath = "bounds"
animBounds.fromValue = NSValue(cgRect:CGRect(x: button_x+(button_w-button_h)/2, y: button_h, width: button_h, height: button_h))
animBounds.toValue = NSValue(cgRect:CGRect(x: 0, y: 0, width: button_w, height: button_h))
let animAlpha:CABasicAnimation = CABasicAnimation()
animAlpha.keyPath = "opacity";
animAlpha.toValue = 1.0
let animBackground:CABasicAnimation = CABasicAnimation()
animBackground.keyPath = "backgroundColor"
animBackground.toValue = FreshGreen.cgColor
let group:CAAnimationGroup = CAAnimationGroup()
group.duration = 1
group.repeatCount = 1
group.isRemovedOnCompletion = false
group.fillMode=kCAFillModeForwards
group.timingFunction = CAMediaTimingFunction(name:kCAMediaTimingFunctionEaseInEaseOut)
group.animations = [animMakeBigger,animBounds,animAlpha,animBackground]
let animBorder:CABasicAnimation = CABasicAnimation()
animBorder.keyPath = "borderColor"
animBorder.toValue = FreshGreen.cgColor
let allGroup:CAAnimationGroup = CAAnimationGroup()
allGroup.duration = 1
allGroup.repeatCount = 1
allGroup.isRemovedOnCompletion = false
allGroup.fillMode=kCAFillModeForwards
allGroup.timingFunction = CAMediaTimingFunction(name:kCAMediaTimingFunctionEaseInEaseOut)
allGroup.animations = [animMakeBigger,animBounds,animAlpha,animBorder]
CATransaction.begin()
view?.layer.add(group, forKey: "allMyAnimationspread1")
allGroup.setValue("allMyAnimationsBoardspread1", forKey: "groupborderkey1")
allGroup.delegate = self
viewborder?.layer.add(allGroup, forKey: "allMyAnimationsBoardspread1")
CATransaction.commit()
}
最后在 ViewController 调用

var singleTap1:UITapGestureRecognizer?
var singleTap2:UITapGestureRecognizer?
var singleTap3:UITapGestureRecognizer?
var buttonview1:ButtonView?
var buttonview2:ButtonView?
var buttonview3:ButtonView?
override func viewDidLoad() {
super.viewDidLoad()
buttonview1 = ButtonView(frame:CGRect(x: 100, y: 150, width: 210, height: 70))
buttonview2 = ButtonView(frame:CGRect(x: 100, y: 275, width: 210, height: 70))
buttonview3 = ButtonView(frame:CGRect(x: 100, y: 400, width: 210, height: 70))
singleTap1 = UITapGestureRecognizer(target: self, action: #selector(ViewController.viewAction1))
singleTap2 = UITapGestureRecognizer(target: self, action: #selector(ViewController.viewAction2))
singleTap3 = UITapGestureRecognizer(target: self, action: #selector(ViewController.viewAction3))
buttonview1?.addGestureRecognizer(singleTap1!)
buttonview2?.addGestureRecognizer(singleTap2!)
buttonview3?.addGestureRecognizer(singleTap3!)
self.view.addSubview(buttonview1!)
self.view.addSubview(buttonview2!)
self.view.addSubview(buttonview3!)
}
func viewAction1(){
buttonview1?.startAnimation()
}
func viewAction2(){
buttonview2?.startAnimation()
}
func viewAction3(){
buttonview3?.startAnimation()
}

效果如下:

20170624149831082641559.gif

以上代码:点击查看