CATransition 同 CoreAnimation 核心动画中 CABasicAnimation 等相关类的使用方法类似。主要分为三个步骤:
(1)实例化 CATransition,并设置相应的转场动画 key。
(2)设置合适的转场动画属性,比如动画时间、过渡方向、动画保持状态等。
(3)将动画效果添加到对应视图的 Layer 图层中。
CATransition 转场动画效果合集
例如:基于 CATransition 的图片查看器
先初始化一张图片视图和按钮
var imageView:UIImageView? var animBtn:UIButton? override func viewDidLoad() { super.viewDidLoad() imageView = UIImageView() imageView?.frame = CGRect(x: 0, y: 0, width: 300, height: 400) imageView?.center = self.view.center imageView?.image = UIImage(named: "1.jpg") imageView?.contentMode = UIViewContentMode.scaleAspectFit self.view.addSubview(imageView!) animBtn = UIButton() animBtn?.frame = CGRect(x: 20, y: 30, width: 80, height: 44) animBtn?.backgroundColor = UIColor.red animBtn?.setTitle("AnimBtn", for: UIControlState.normal) animBtn?.setTitleColor(UIColor.white, for: UIControlState.normal) animBtn?.addTarget(self, action: #selector(animBtnClick), for: UIControlEvents.touchUpInside) self.view.addSubview(animBtn!) }
|
实现按钮的点击事件和动画效果,一次使用一个效果即可
func animBtnClick() { imageView?.image = UIImage(named: "2.jpg") let animation:CATransition = CATransition() animation.duration = 2; animation.type = "oglFlip" animation.type = "cube" animation.type = "stuckEffect" animation.type = "rippleEffect" animation.type = "pageUnCurl" animation.type = "pageCurl" animation.type = "cameraIrisHollowOpen" animation.type = "cameraIrisHollowClose" animation.type = kCATransitionFade animation.type = kCATransitionPush animation.type = kCATransitionReveal animation.type = kCATransitionMoveIn animation.subtype = kCATransitionFromRight self.view.layer.add(animation, forKey: nil) }
|
视图过渡动画
视图控制器过渡动画相关协议
(1)UINavigationControllerDelegate
(2)UIViewControllerAnimatedTransitioning
UINavigationControllerDelegate 是视图控制器使用的委托代理协议,该协议可以代理视图的以下功能:
(1)拦截导航栏视图控制器
(2)拦截视图控制器目标 ViewController 和源 ViewController。
在过渡动画中将使用 UINavigationControllerDelegate 的第二个功能,即拦截视图控制器目标 ViewController 和源 ViewController。该功能的回调方法如下所示:
func navigationController(_ navigationController: UINavigationController, animationControllerFor operation: UINavigationControllerOperation, from fromVC: UIViewController, to toVC: UIViewController) -> UIViewControllerAnimatedTransitioning?{ }
|
在该方法中 formVC 表明该视图控制器在跳转过程中来自哪个视图控制器。toVC 表明该视图控制器在跳转过程中最终跳转到何处去。所以只要拿到这两个视图控制器,在其上的 View 图层中添加想要实现的动画即可实现转场过渡动画效果。
实际上以上所有的动画操作都将借助于 UIViewControllerAnimatedTransitioning 协议,将所有的动画效果最终封装成一个实例对象返回给视图控制器 UIViewController-AnimatedTransitioning 协议,定义了视图过渡动画的执行周期和执行内容。
它有两个非常重要的回调方法。
func transitionDuration(using transitionContext: UIViewControllerContextTransitioning?) -> TimeInterval func animateTransition(using transitionContext: UIViewControllerContextTransitioning?)
|
transitionDuration 方法返回转场动画执行周期。
animateTransition 方法用于构建转场动画内容。在该方法中可以通过 transitionContext 属性获取当前的 fromViewController 和 toViewController。拿到这两个视图控制器后就可以设置当前视图控制器的各种动画效果。
视图控制器过渡动画实现
第一步:实现当前页面 ViewController.swift 内容
var viewcontroller:NewViewController = NewViewController() override func viewDidLoad() { super.viewDidLoad() self.title = "Main Viewcontroller"; self.view.backgroundColor = UIColor.blue navigationController!.delegate = self } func navigationController(_ navigationController: UINavigationController, animationControllerFor operation: UINavigationControllerOperation, from fromVC: UIViewController, to toVC: UIViewController) -> UIViewControllerAnimatedTransitioning?{ let transitionAnim:TransitionAnim = TransitionAnim() return transitionAnim } override func touchesBegan(_ touches: Set<UITouch>, with event: UIEvent?) { self.navigationController?.pushViewController(viewcontroller, animated: false) }
|
第二步:实现下一页面 NewViewController.swift 内容
override func viewDidLoad() { super.viewDidLoad() self.view.backgroundColor = UIColor.red self.title = "New Viewcontroller" }
|
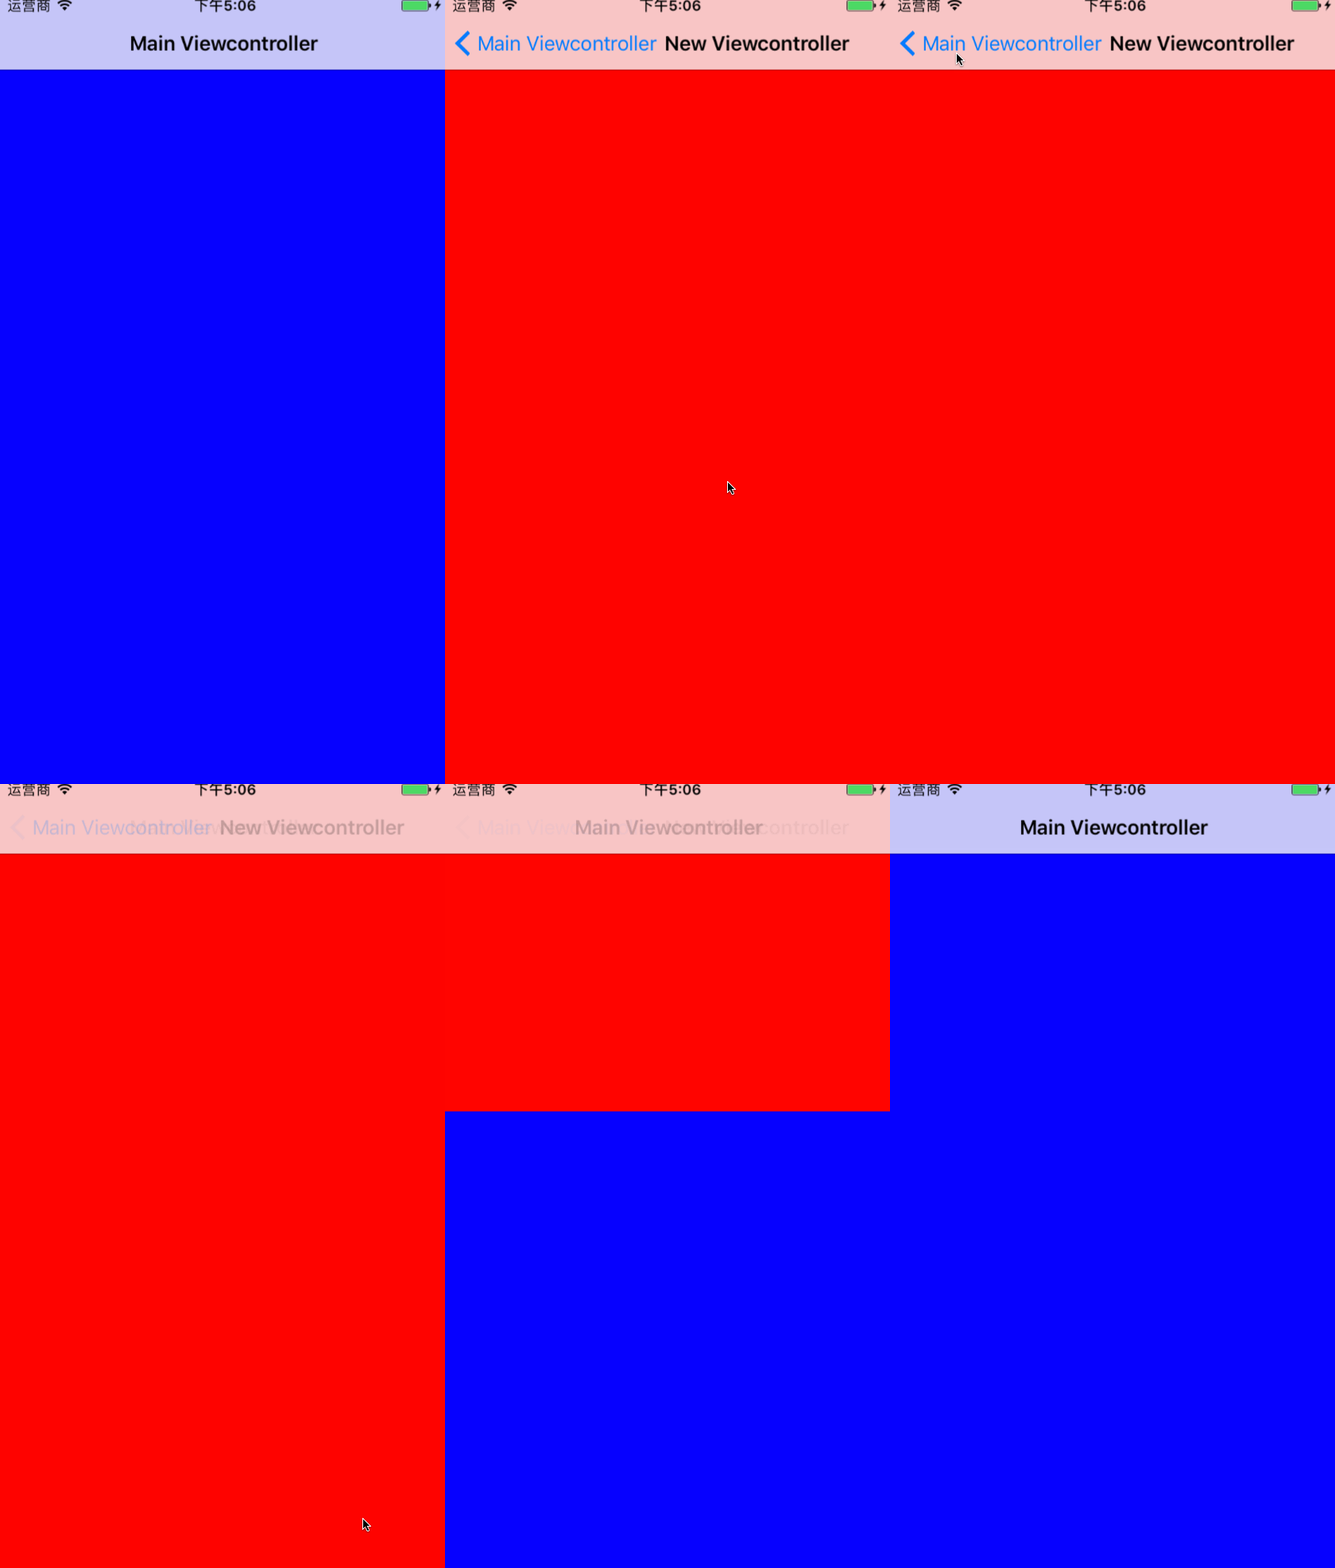
第三步:实现视图控制器转场动画。这里实现一个从下到上的推出动画效果。TransitionAnim.swift 内容如下
class TransitionAnim: NSObject,UIViewControllerAnimatedTransitioning { func transitionDuration(using transitionContext: UIViewControllerContextTransitioning?) -> TimeInterval{ return 2 } func animateTransition(using transitionContext: UIViewControllerContextTransitioning){ let fromVC:UIViewController = transitionContext.viewController(forKey: UITransitionContextViewControllerKey.from)! let toVC:UIViewController = transitionContext.viewController(forKey: UITransitionContextViewControllerKey.to)! let fromVCRect = transitionContext.initialFrame(for: fromVC) let toVCRect = CGRect(x: 0,y: fromVCRect.size.height*2,width: fromVCRect.size.width,height: fromVCRect.size.height) let fromView:UIView = fromVC.view let toView:UIView = toVC.view fromView.frame = fromVCRect toView.frame = toVCRect transitionContext.containerView.addSubview(fromView) transitionContext.containerView.addSubview(toView) UIView.animate(withDuration: 2, animations: { () in toView.frame = fromVCRect; toView.alpha = 1; }, completion: { (Bool) in transitionContext.completeTransition(true) }) } }
|
最终效果如下:

侧滑栏动画
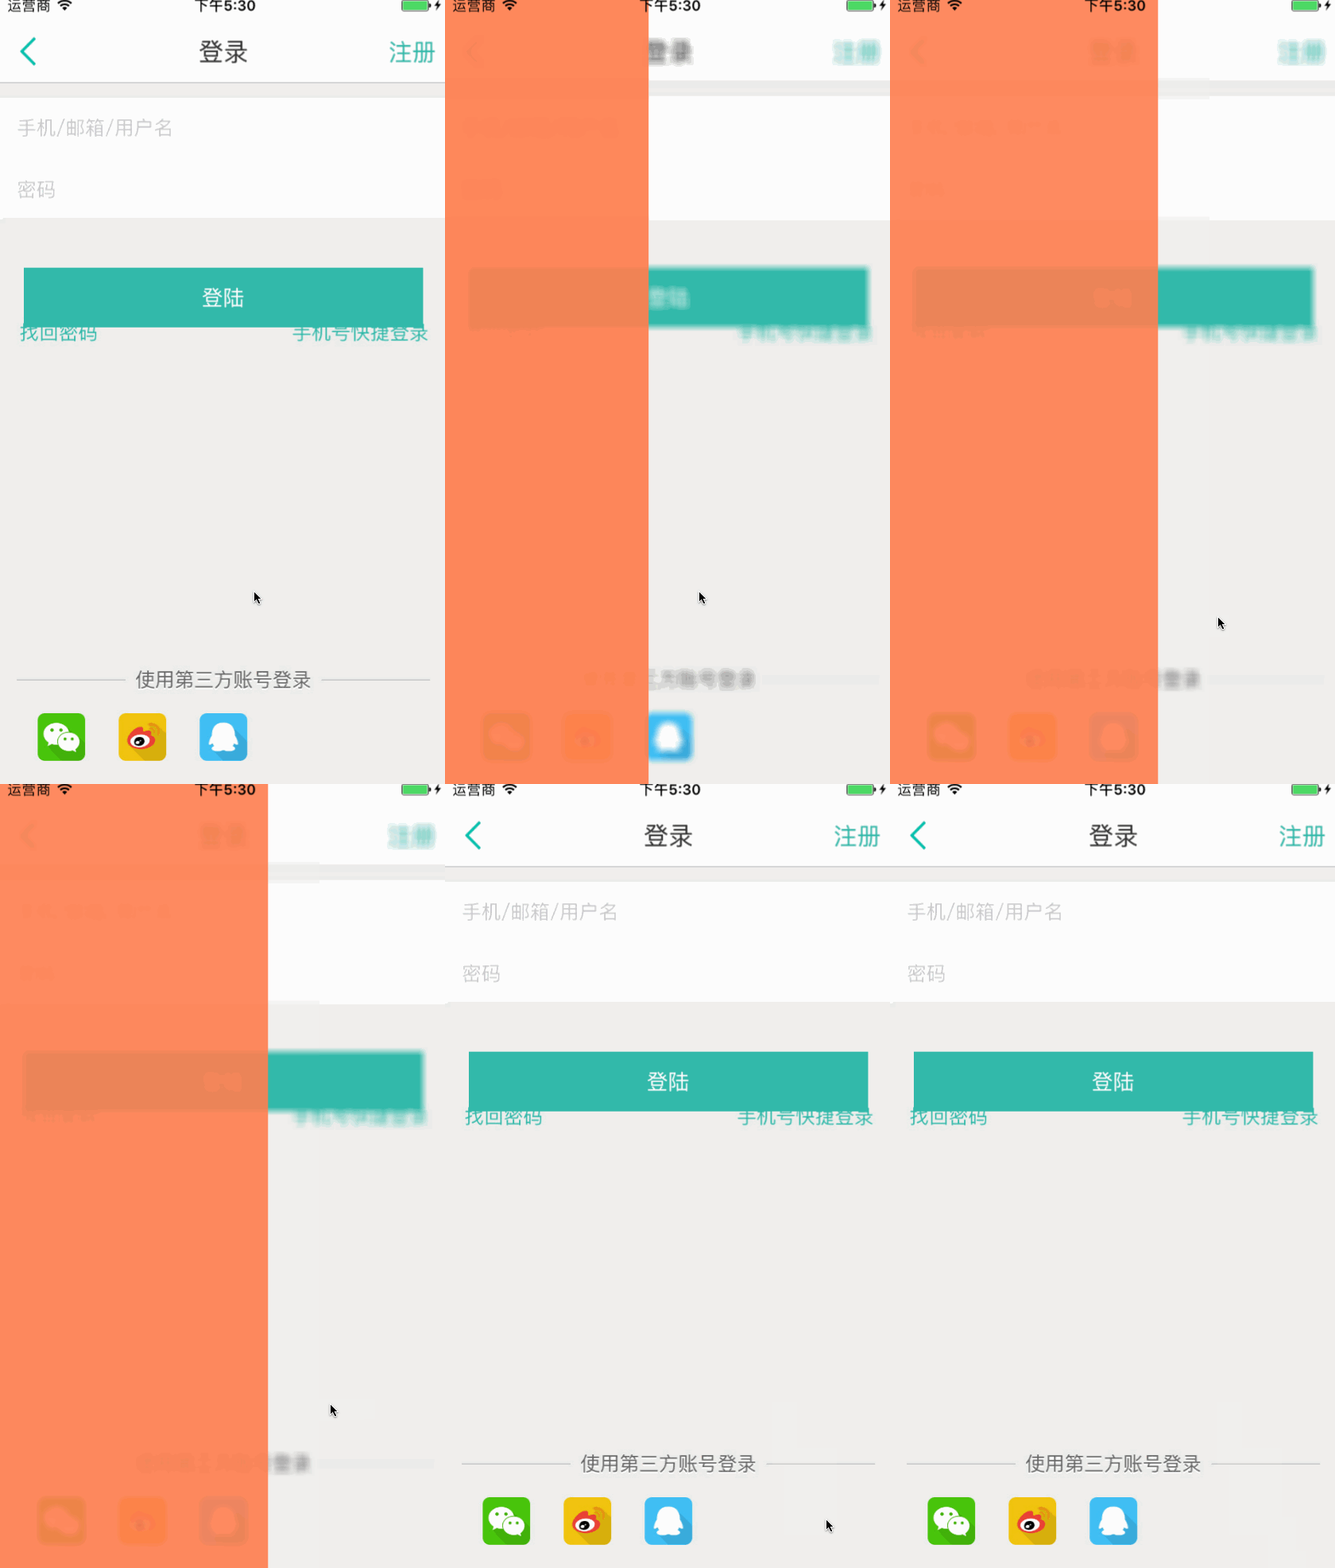
参考网上的一些新闻类应用,发现在侧滑栏动画实现的同时还具有蒙版或者模糊效果,所以在这个案例中将动画分为2个部分,第一部分为蒙版模糊效果,第二部分为侧滑滑出以及收起效果。
第一部分:蒙版模糊效果
func blurimageFromImage(_ image:UIImage)->UIImage{ let blurRadix:UInt32 = 7 let img:CGImage = image.cgImage! let inProvider:CGDataProvider = img.dataProvider! let bitmapdata:CFData = inProvider.data! var inputBuffer:vImage_Buffer = vImage_Buffer() inputBuffer.data=(UnsafeMutableRawPointer)(mutating: CFDataGetBytePtr(bitmapdata)) inputBuffer.width=(vImagePixelCount)(img.width) inputBuffer.height=(vImagePixelCount)(img.height) inputBuffer.rowBytes=img.bytesPerRow; let pixelBuffer:UnsafeMutableRawPointer = malloc(img.bytesPerRow * img.height); var outputBuffer:vImage_Buffer = vImage_Buffer() outputBuffer.data=pixelBuffer outputBuffer.width=(vImagePixelCount)(img.width) outputBuffer.height=(vImagePixelCount)(img.height) outputBuffer.rowBytes=img.bytesPerRow; vImageBoxConvolve_ARGB8888(&inputBuffer, &outputBuffer, nil, 0, 0, blurRadix, blurRadix, nil, UInt32(kvImageEdgeExtend)) let colorSpace = CGColorSpaceCreateDeviceRGB() let w:Int=(Int)(outputBuffer.width) let h:Int=(Int)(outputBuffer.height) let ctx:CGContext = CGContext(data: outputBuffer.data, width: w, height: h, bitsPerComponent: 8, bytesPerRow: outputBuffer.rowBytes, space: colorSpace, bitmapInfo: image.cgImage!.bitmapInfo.rawValue)! let imageRef:CGImage = ctx.makeImage ()! let imagenew:UIImage = UIImage(cgImage:imageRef) free(pixelBuffer) return imagenew; }
|
func imageFromUIView(_ view:UIView)->UIImage{ UIGraphicsBeginImageContext(view.frame.size) let content:CGContext = UIGraphicsGetCurrentContext()! view.layer.render(in: content) let imagenew:UIImage = UIGraphicsGetImageFromCurrentImageContext()!; UIGraphicsEndImageContext(); return imagenew }
|
第二部分:侧滑初始化
import Accelerate let DEVICE_SCREEN_HEIGHT = UIScreen.main.bounds.height let DEVICE_SCREEN_WIDTH = UIScreen.main.bounds.width class SliderViewController: UIViewController { internal var blurView:UIView? internal var contentView:UIView? override func viewDidLoad() { super.viewDidLoad() blurView = UIView(frame: CGRect(x: 0, y: 0, width: DEVICE_SCREEN_WIDTH, height: DEVICE_SCREEN_HEIGHT)) self.view.addSubview(blurView!) contentView = UIView(frame: CGRect(x: -DEVICE_SCREEN_WIDTH*0.60, y: 0, width: DEVICE_SCREEN_WIDTH*0.60, height: DEVICE_SCREEN_HEIGHT)) contentView!.backgroundColor = UIColor(red: 255.0 / 255.0, green: 127.0 / 255.0, blue: 79.0 / 255.0, alpha: 1.0) self.view.addSubview(contentView!) }
|
侧滑栏收起效果
func sliderVCDismiss(){ UIView.animate(withDuration: 0.5, animations: {()->Void in self.contentView!.frame = CGRect(x: -DEVICE_SCREEN_WIDTH*0.6, y: 0, width: DEVICE_SCREEN_WIDTH*0.6, height: DEVICE_SCREEN_HEIGHT) self.contentView!.alpha = 0.9 }, completion: {(finished:Bool)->Void in self.view.alpha=0.0 }) }
|
侧滑栏弹出动画
func sliderLeftViewAnimStart(){ var windowview:UIView = UIView() windowview = UIApplication.shared.keyWindow!.rootViewController!.view blurView?.layer.contents = blurimageFromImage(imageFromUIView(windowview)).cgImage self.view.alpha=1.0 UIView.animate(withDuration: 0.5, animations: {()->Void in self.contentView!.frame = CGRect(x: 0, y: 0, width: DEVICE_SCREEN_WIDTH*0.6, height: DEVICE_SCREEN_HEIGHT) self.contentView!.alpha = 0.9 }, completion: {(finished:Bool)->Void in }) }
|
在 ViewController 中进行调用
var pushSliderVC:Bool = true var sliderVC:SliderViewController = SliderViewController() override func viewDidLoad() { super.viewDidLoad() let imageView:UIImageView = UIImageView(frame:CGRect(x: 0, y: 0, width: DEVICE_SCREEN_WIDTH, height: DEVICE_SCREEN_HEIGHT)) imageView.image = UIImage(named: "login.png") self.view.addSubview(imageView) let loginButton:UIButton = UIButton(frame: CGRect(x: 20, y: 230, width: self.view.frame.width-20*2,height: 50)) loginButton.backgroundColor = UIColor(red: 50/255.0, green: 185/255.0, blue: 170/255.0, alpha: 1.0) loginButton.setTitle("登陆", for: UIControlState()) self.view.addSubview(loginButton) sliderVC.view.frame = CGRect(x: 0, y: 0, width: DEVICE_SCREEN_WIDTH, height: DEVICE_SCREEN_HEIGHT) sliderVC.view.isHidden=true self.view.addSubview(sliderVC.view) } override func touchesBegan(_ touches: Set<UITouch>, with event: UIEvent?) { if pushSliderVC { sliderVC.view.isHidden = false sliderVC.sliderLeftViewAnimStart() }else{ sliderVC.view.isHidden = true sliderVC.sliderVCDismiss() } pushSliderVC = !pushSliderVC }
|
最终效果如下:

全文代码:点击查看

微信扫一扫,向我赞赏

支付宝扫一扫,向我赞赏


